Need to connect a Mikrotik router to your ACS Project?
ACS Settings
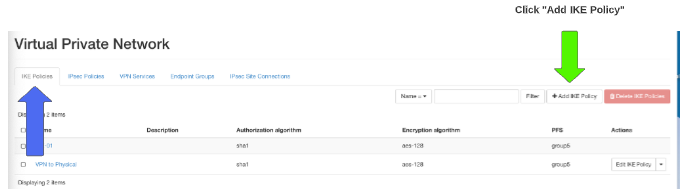
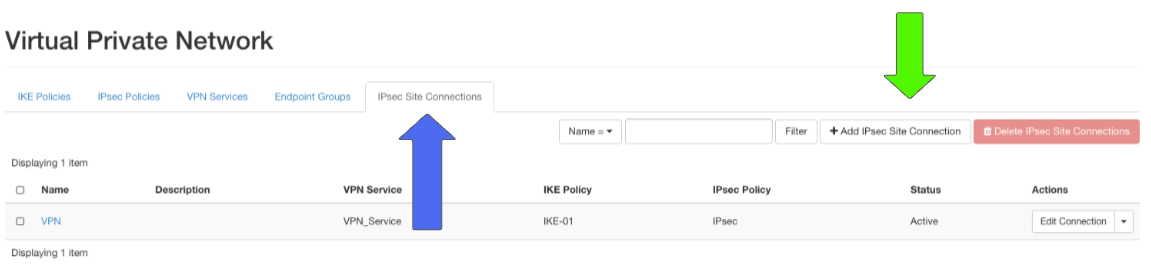
Navigate to the VPN section in ACS.
Network > VPN
**Both sides have to match every detail on Site-to-Site VPNs
Common mismatches
-Lifetimes
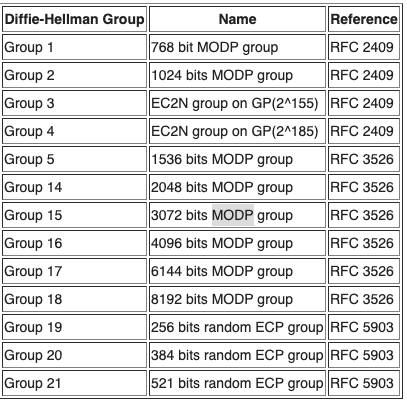
- DH/PFS Groups
-Secret Key
Don't forget to add a Security Group to the instances that will need to communicate over the VPN.
Reference our KB on Security Groups here: LINK
Mikrotik wiki manual: LINK
Step 1: IKE Policies
Click > +Add IKE Policy
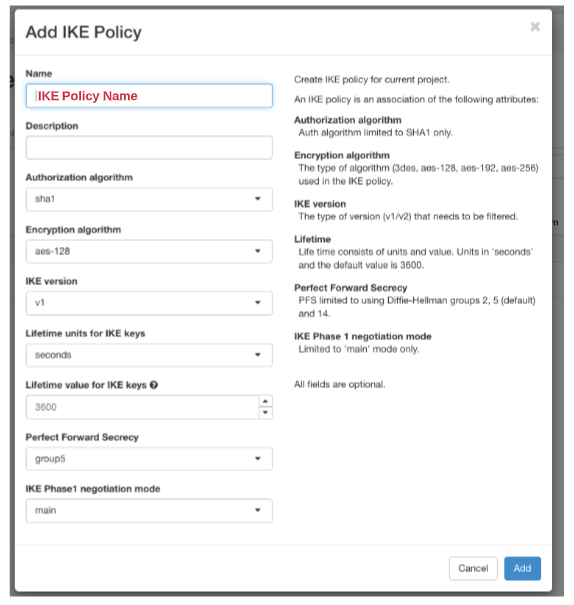
Step 2:
Add a Name for your IKE Policy
Description is optional and will show in the previous screen
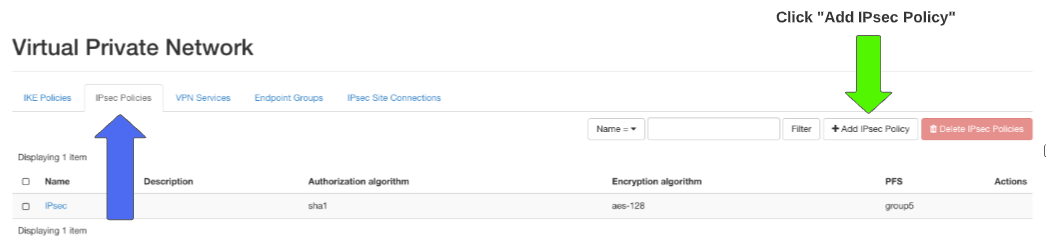
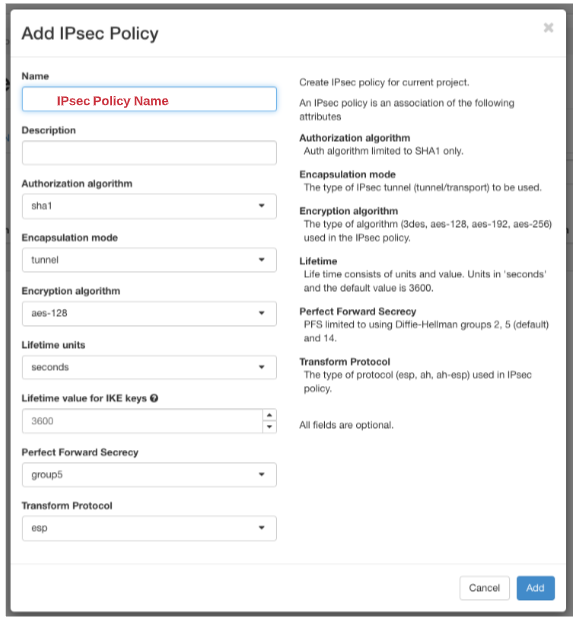
Step 3:IPsec Policy
Click > +Add IPsec Policy
Step 4:
Add a Name for your IPsec Policy
Description is optional and will show in the previous screen
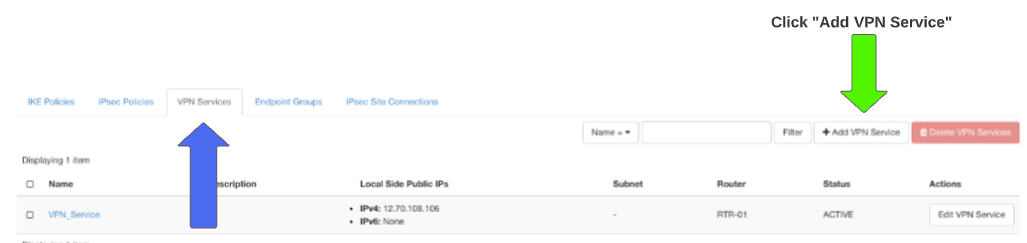
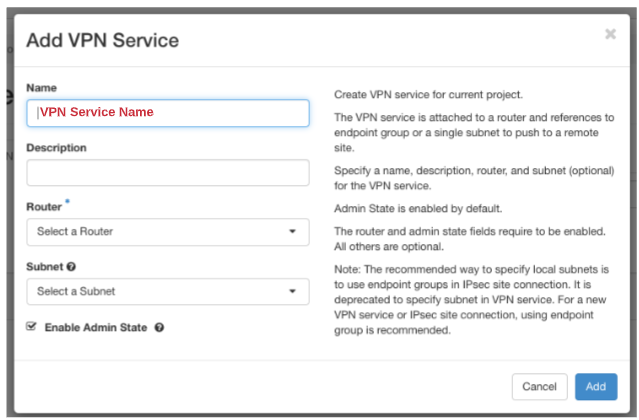
Step 5: VPN Service
Click > +Add VPN Service
Step 6:
Add a Name for your VPN Service
Description is optional and will show in the previous screen
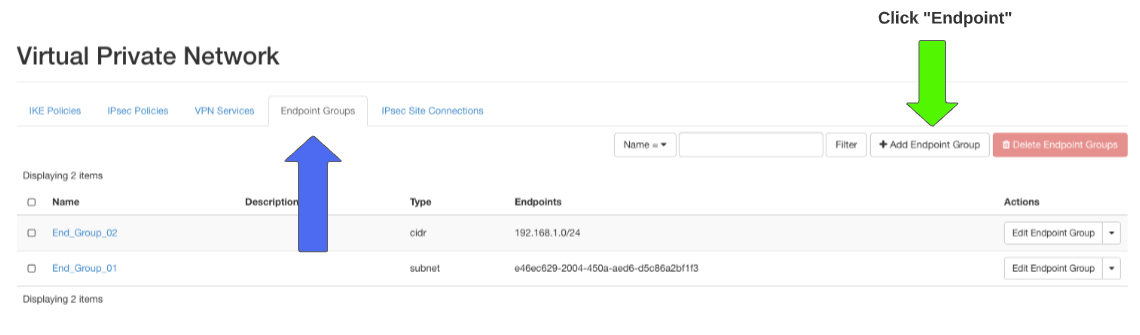
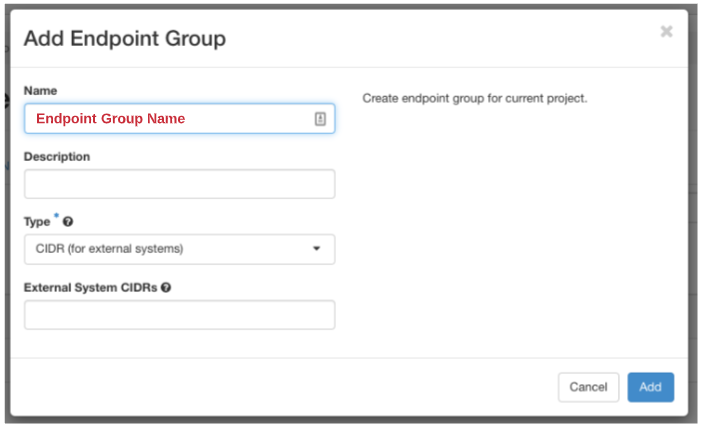
Step 7:
End Point Group
Click > +Add Endpoint Group
Step 8:
Add a Name for your Endpoint Group
Description is optional and will show in the previous screen
Step 9:
IPsec Site Connection
Click > +Add IPsec Site Connection
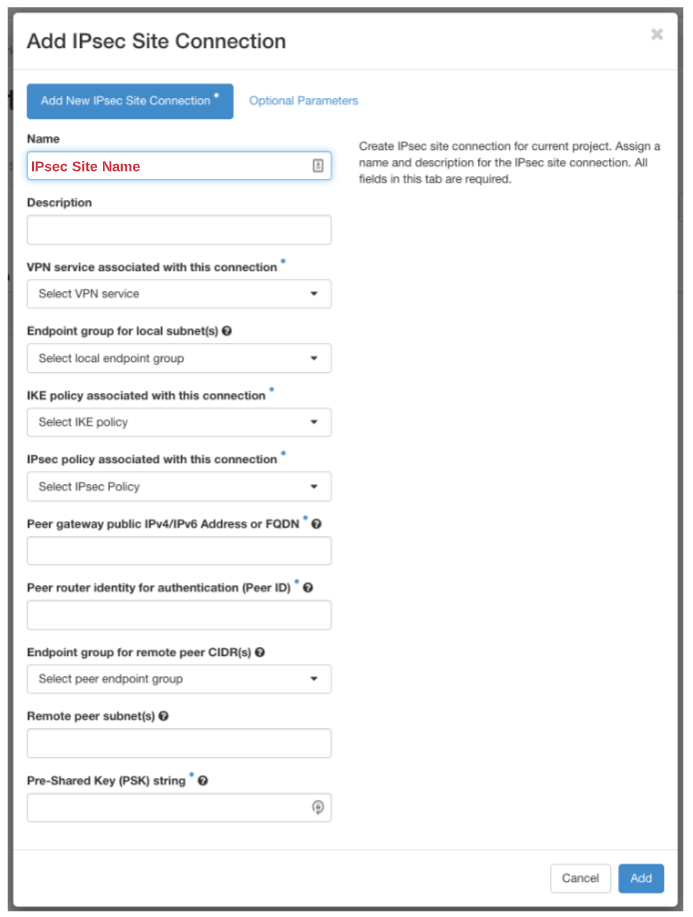
Step 10:
Add a Name for your IPsec Site
Description is optional and will show in the previous screen
Peer gateway public IPv4/IPv6 Address or FQDN*
&
Peer router identity for authentication (Peer ID)*
This is the public IP of the physical router you are connecting ACS to.
Mikrotik Settings
Step 1: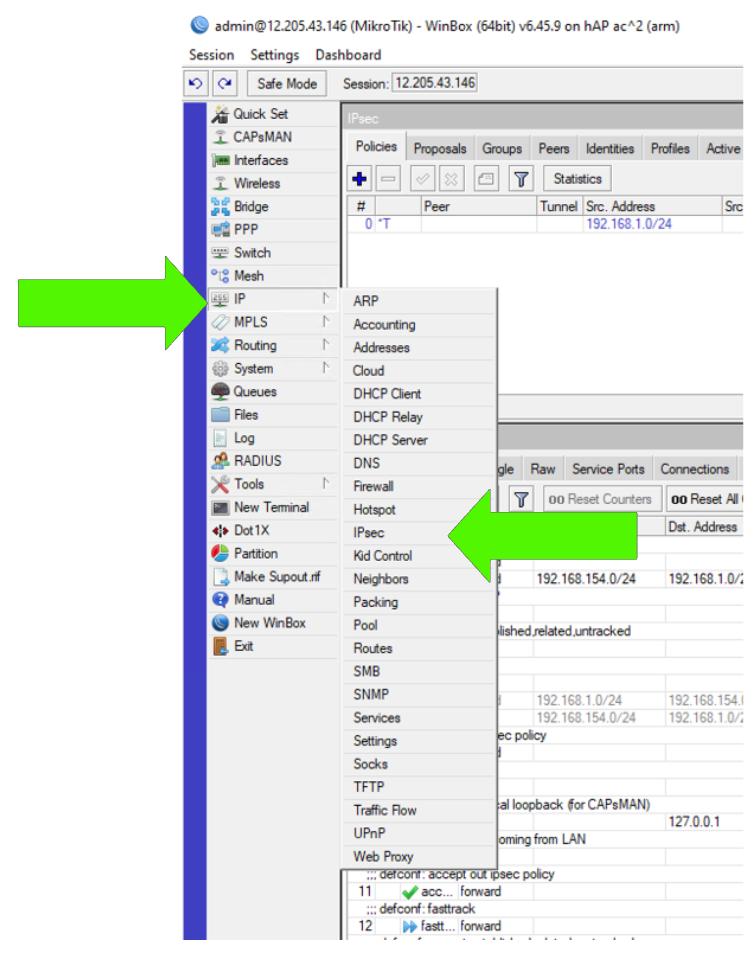
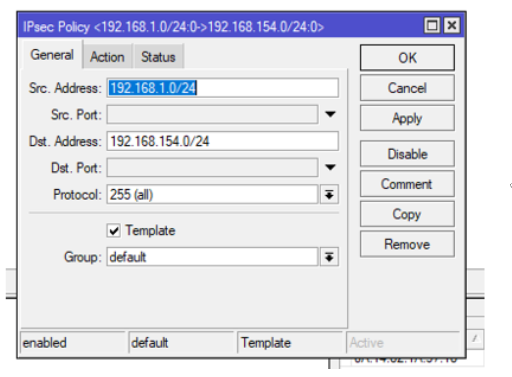
Step 2: IPsec Policy
Click on the Policy tab
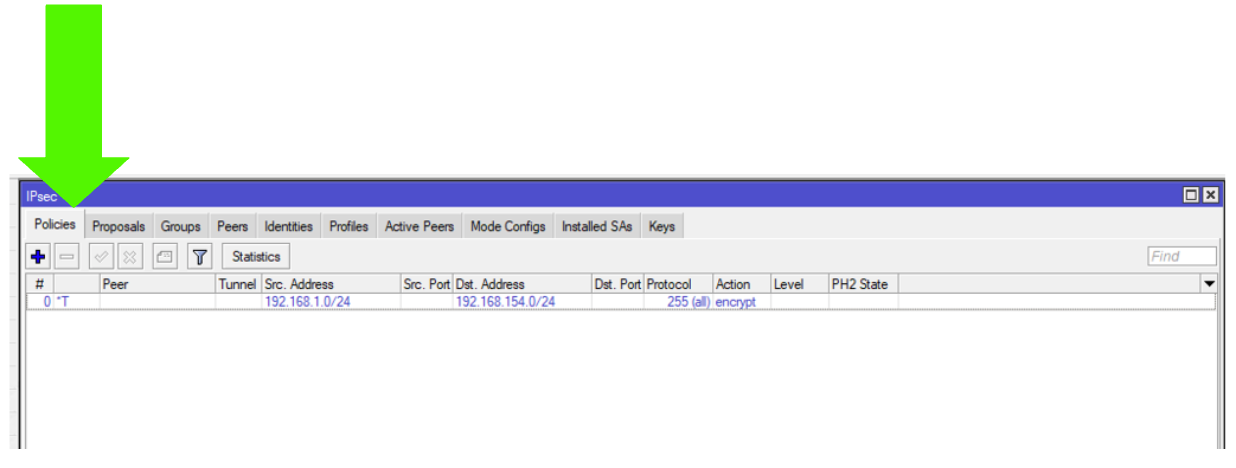
Step 3:
- Add a Src. Address CIDR., this is the IP CIDR of the physical site
- Add a Dst. Address CIDR., this is the IP CIDR of your ACS network you want to connect to.
Under the Action tab
Action: encrypt
IPsec Protocols: esp
Proposal: default
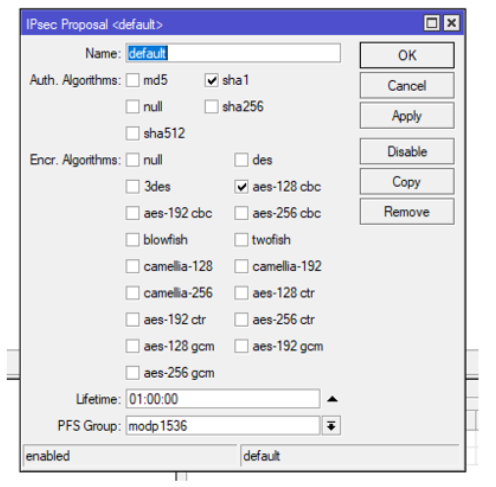
Step 4: Proposals
Click on the Proposals tab
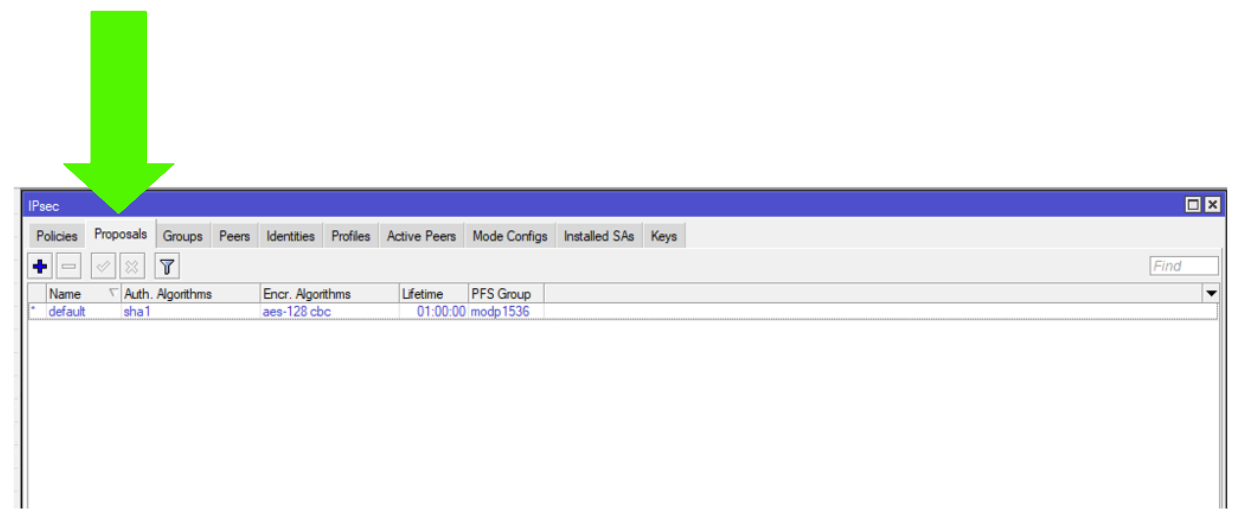
Step 5:
Encr. Algorithms: aes-128 cbc (aes-128)
Lifetime: DD:HH:MM
PFS Group: modp1536 (Group 5)
Step 6: Groups
Click on the Groups tab
We are keeping *default for this KB.
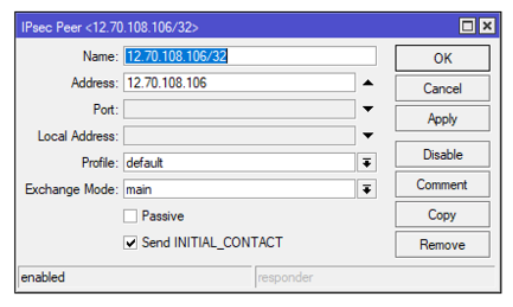
Step 7: Peers
Click on the Peers tab
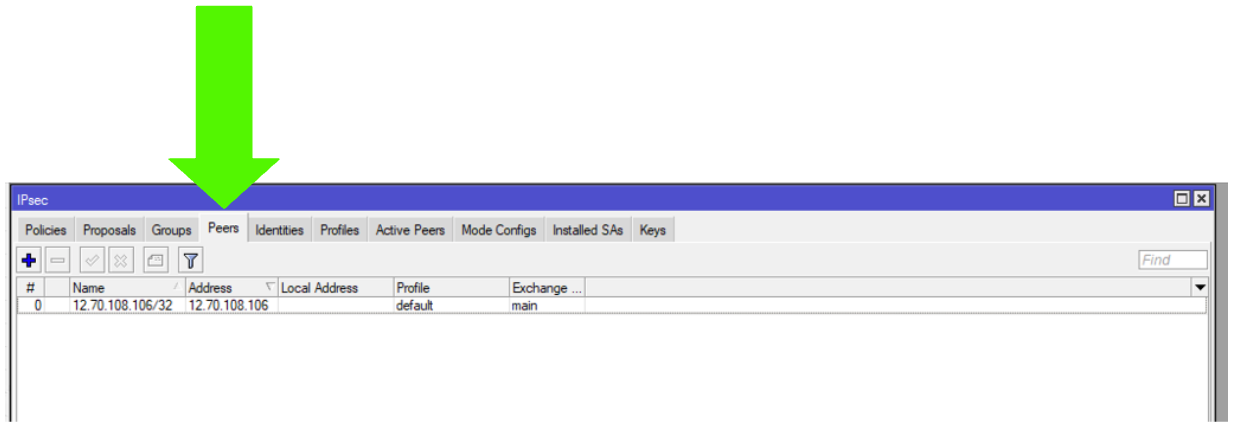
Step 8: IPsec Peer
Name:
Step 9: Identities
Click on the Identities tab
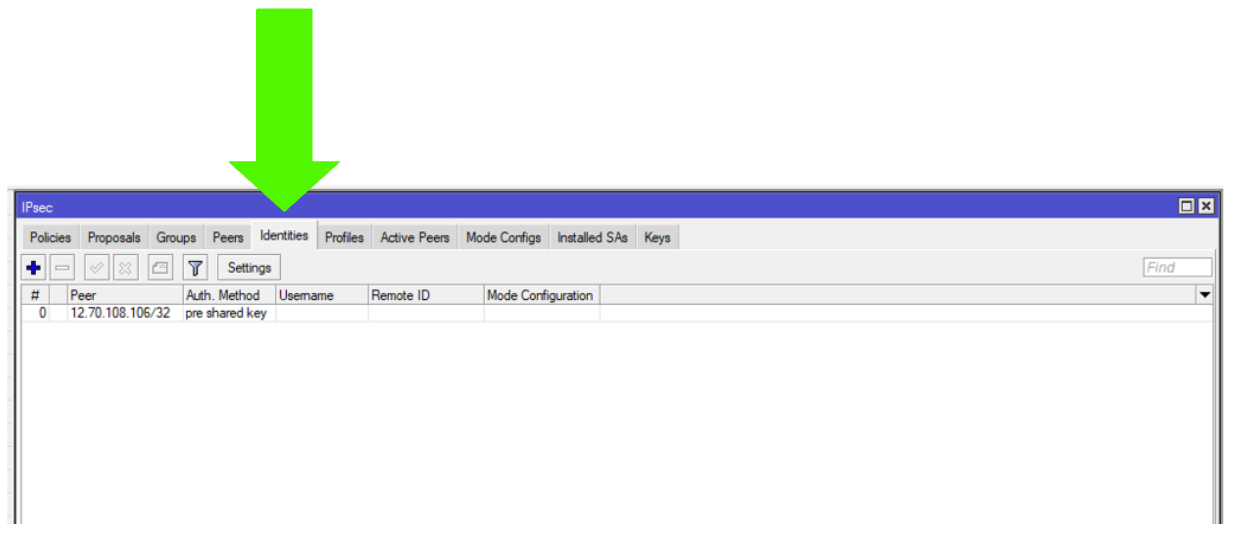
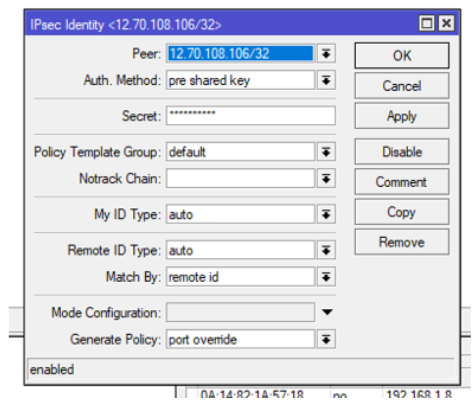
Step 10: IPsec Identity
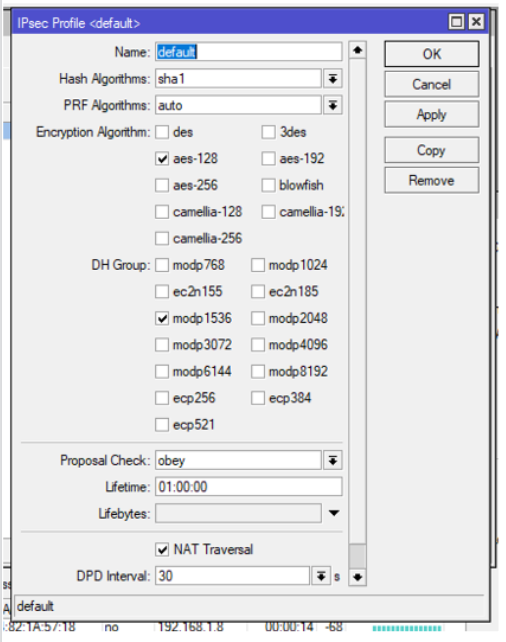
Step 11: IPSec Profiles
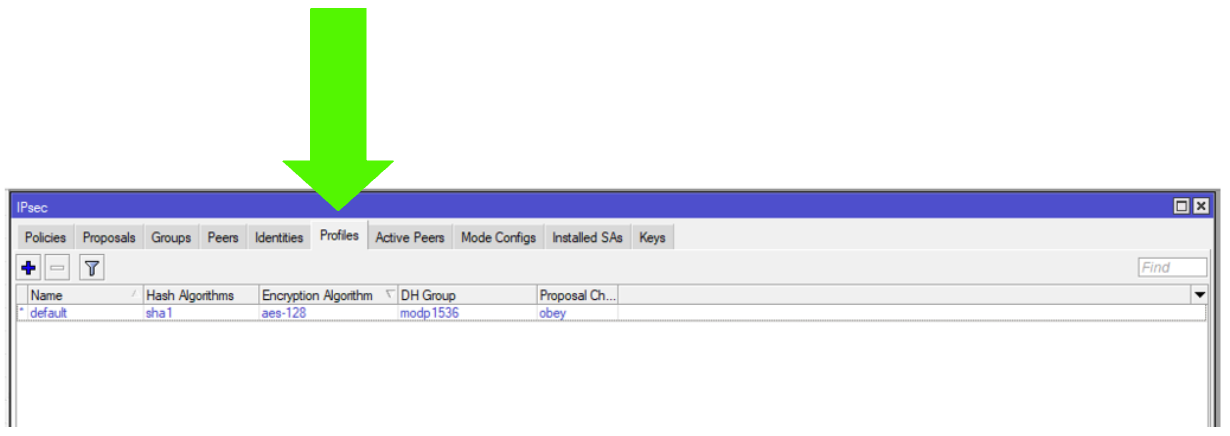
Step 12: IPSec Profiles
DH Group: modp1536 (Group5)
Step 13: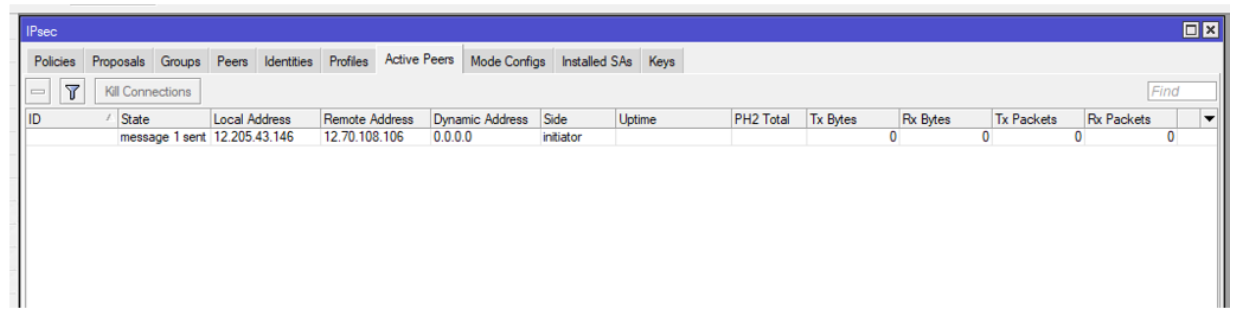
Step 14:
Step 15:

Step 16:
Firewall/NAT Rules
Now if you are unable to establish IPSec tunnel, there are a lot of issues that can be reason for this – first, double check all your IPSec settings (Peer, Proposals, Secret, Profile, Policy…)
Check your routing, gateway, NAT and firewall settings (in some case port 500, 4500, 50 and few more needs to go through).
I got a lot of issues with IPSec in the past, and reasons for problems were different, and sometimes very hard to pinpoint.
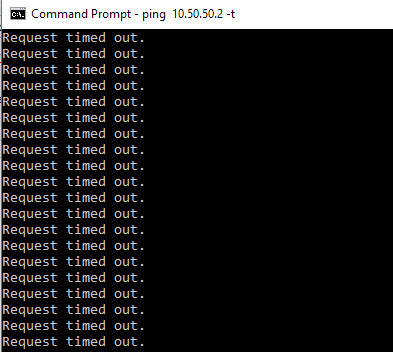
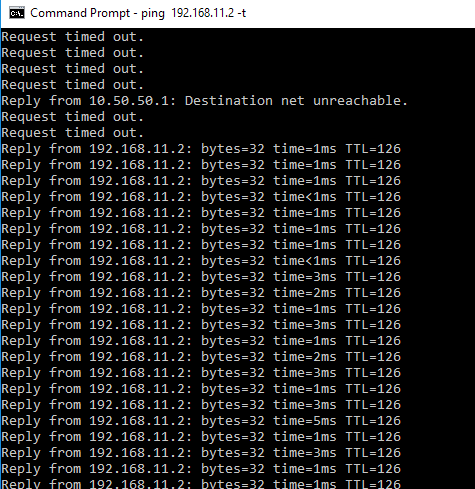
Now, on local PCs both in Office1 and Office2 I started ping command, but no luck
I started pinging Office1 PC1 10.50.50.2 from Office 2 PC2 192.168.11.1
and vice versa
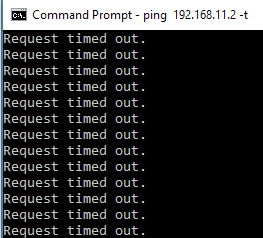
But no luck.
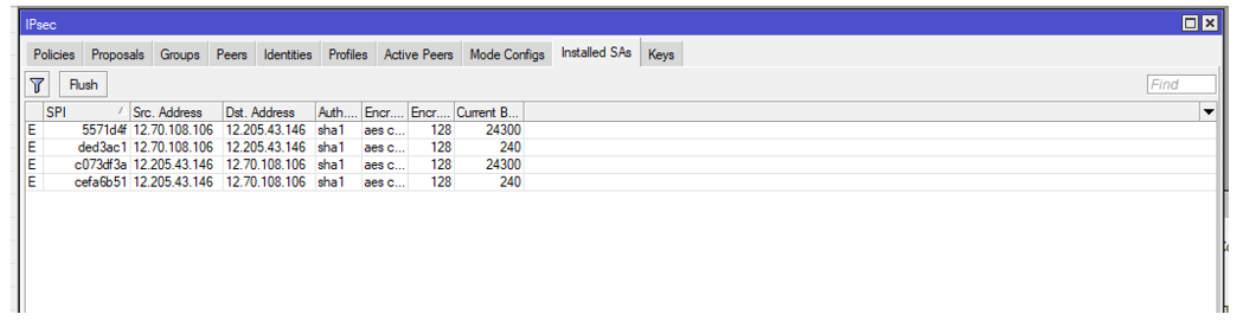
Ok, I allowed ping (ICMP) from firewalls on both machines, but no luck. Tunnel is established, but there is no traffic through it.
Ok, so we need to mess a bit more with routers in both offices.
Again, I’m going to show how to configure Office 1, and steps should be repeated on second side of the tunnel.
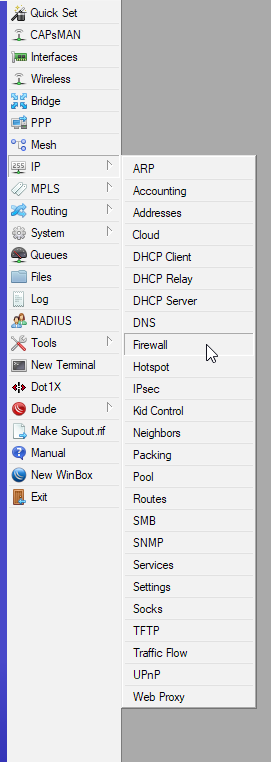
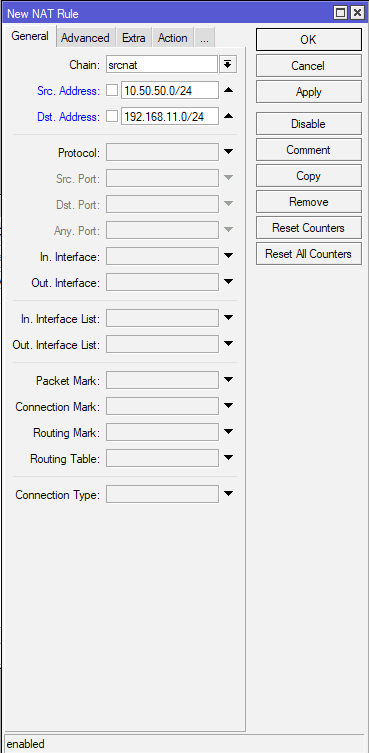
IP | Firewall
On Firewall select NAT tab and click on plus (+) sign

On New NAT Rule under Chain select srcnat, in Src. Address enter local subnet of Office 1 – 10.50.50.0/24 and in Dst.Address remote subnet of Office 2 – 192.168.11.0/24
(Office 2 – on Office 2 chain is also srcnat, Src.Address is physical side and Dst. Address is ACS network)
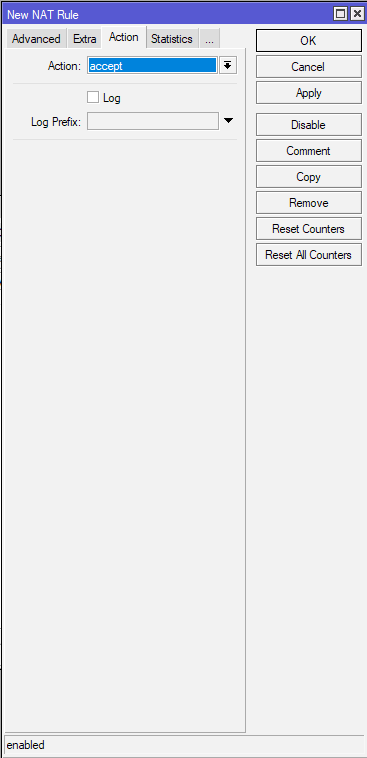
Action tab – under Action select Accept. Confirm with Apply – OK
(Office 2 – same setting – accept)
After Rule is created, make sure it resides on the top spot in NAT tab – it is very important that this is the first rule!!
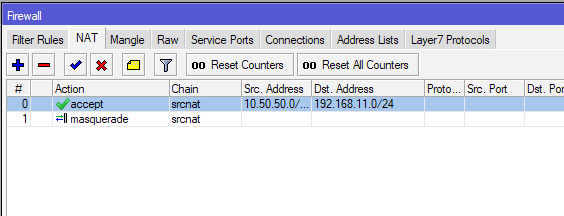
Repeat the process on the other side and then REBOOT both routers.
After reboot ping should start
Traffic can also be seen through created NAT rule.

That is it, I have a working IPSec Site to Site tunnel.
[admin@MikroTik] > export
# feb/27/2021 14:06:41 by RouterOS 6.48.1
# software id = 6XNY-S16R
#
# model = RBD52G-5HacD2HnD
# serial number = DXXXXXXXXXXX
/interface bridge
add admin-mac=48:8F:5A:B7:15:97 auto-mac=no comment=defconf name=bridge
/interface wireless
set [ find default-name=wlan1 ] band=2ghz-b/g/n channel-width=20/40mhz-XX disabled=no \
distance=indoors frequency=auto installation=indoor mode=ap-bridge ssid=MikroTik-B7159B \
station-roaming=enabled wireless-protocol=802.11
set [ find default-name=wlan2 ] band=5ghz-a/n/ac channel-width=20/40/80mhz-XXXX disabled=no \
distance=indoors frequency=auto installation=indoor mode=ap-bridge ssid=ProPools \ station-roaming=enabled wireless-protocol=802.11
/interface list
add comment=defconf name=WAN
add comment=defconf name=LAN
/interface wireless security-profiles
set [ find default=yes ] authentication-types=wpa2-psk mode=dynamic-keys supplicant-identity=\
MikroTik wpa-pre-shared-key=X wpa2-pre-shared-key=X
/ip ipsec peer
add address=12.X.X.X/32 name=12.X.X.X/32
/ip ipsec profile
set [ find default=yes ] dh-group=modp1536 dpd-interval=30s enc-algorithm=aes-128 lifetime=1h
/ip ipsec proposal
set [ find default=yes ] enc-algorithms=aes-128-cbc lifetime=1h pfs-group=modp1536
/ip pool
add name=dhcp ranges=192.168.1.2-192.168.1.254
/ip dhcp-server
add address-pool=dhcp disabled=no interface=bridge name=defconf
/user group
set full policy="local,telnet,ssh,ftp,reboot,read,write,policy,test,winbox,password,web,sniff,\
sensitive,api,romon,dude,tikapp"
/interface bridge port
add bridge=bridge comment=defconf interface=ether2
add bridge=bridge comment=defconf interface=ether3
add bridge=bridge comment=defconf interface=ether4
add bridge=bridge comment=defconf interface=ether5
add bridge=bridge comment=defconf interface=wlan1
add bridge=bridge comment=defconf interface=wlan2
/ip neighbor discovery-settings
set discover-interface-list=LAN
/interface l2tp-server server
set enabled=yes mrru=1500
/interface list member
add comment=defconf interface=bridge list=LAN
add comment=defconf interface=ether1 list=WAN
/interface pptp-server server
set enabled=yes
/ip address
add address=192.168.1.1/24 comment=defconf interface=ether2 network=192.168.1.0
add address=12.X.X.X/25 interface=ether1 network=12.X.X.X
/ip dhcp-client
add comment=defconf interface=ether1
/ip dhcp-server network
add address=192.168.1.0/24 comment=defconf gateway=192.168.1.1 netmask=24
/ip dns
set allow-remote-requests=yes servers=8.8.8.8
/ip dns static
add address=192.168.1.1 comment=defconf name=router.lan
/ip firewall address-list
add address=192.168.154.0/24 list=vpn
/ip firewall filter
add action=accept chain=forward dst-address=192.168.1.0/24 src-address=192.168.154.0/24
add action=accept chain=input comment="defconf: accept ICMP" protocol=icmp
add action=accept chain=input comment="defconf: accept established,related,untracked" \
connection-state=established,related,untracked
add action=accept chain=input comment=Winbox dst-port=XXXX protocol=tcp
add action=accept chain=forward disabled=yes dst-address=192.168.154.0/24 src-address=\
192.168.1.0/24
add action=accept chain=input disabled=yes dst-address=192.168.1.0/24 src-address=\
192.168.154.0/24
add action=accept chain=forward comment="defconf: accept in ipsec policy" ipsec-policy=\
in,ipsec
add action=drop chain=input comment="defconf: drop invalid" connection-state=invalid
add action=accept chain=input comment="defconf: accept to local loopback (for CAPsMAN)" \
dst-address=127.0.0.1
add action=drop chain=input comment="defconf: drop all not coming from LAN" \
in-interface-list=!LAN
add action=accept chain=forward comment="defconf: accept out ipsec policy" ipsec-policy=\
out,ipsec
add action=fasttrack-connection chain=forward comment="defconf: fasttrack" connection-state=\
established,related
add action=accept chain=forward comment="defconf: accept established,related, untracked" \
connection-state=established,related,untracked
add action=drop chain=forward comment="defconf: drop invalid" connection-state=invalid
add action=drop chain=forward comment="defconf: drop all from WAN not DSTNATed" \
connection-nat-state=!dstnat connection-state=new in-interface-list=WAN
add action=accept chain=forward log=yes log-prefix=vpn-in src-address-list=vpn
/ip firewall nat
add action=accept chain=srcnat dst-address=192.168.154.0/24 src-address=192.168.1.0/24
add action=accept chain=srcnat dst-address=192.168.1.0/24 ipv4-options=strict-source-routing \
protocol=0 src-address=192.168.154.0/24
add action=accept chain=srcnat dst-address=192.168.154.0/24 src-address=192.168.1.0/24
add action=masquerade chain=srcnat comment="defconf: masquerade" ipsec-policy=out,none \
out-interface-list=WAN
add action=masquerade chain=srcnat out-interface=ether1
/ip ipsec identity
add generate-policy=port-override peer=12.70.108.106/32 secret="XXXXX
/ip ipsec policy
set 0 dst-address=192.168.154.0/24 src-address=192.168.1.0/24
/ip route
add distance=1 gateway=12.X.X.X
/system clock
set time-zone-name=America/Chicago
/tool mac-server
set allowed-interface-list=LAN
/tool mac-server mac-winbox
set allowed-interface-list=LAN